Help · Release music
Your first release with the wizard
The release wizard walks you through eight steps, from the title to the delivery package. What each step asks for, the audio and artwork rules, and what every audio check means.
Checked against the app on
The wizard turns a folder of masters and a cover into a release the stores will accept. It saves at every step, so you can stop and come back. Until the last step the release is a draft: nobody outside your band can see it.
Before you start
Have these ready. Each one is explained further down.
- One master per track: WAV or FLAC, 16-bit or 24-bit, 44.1 kHz or higher, stereo.
- The cover: a square JPG or PNG, 3000 × 3000 pixels, in RGB colour.
- Who wrote each song and their share, in percent, adding up to 100.
- A release date at least three weeks away. Spotify needs seven days to consider a song for its playlists, and three weeks leaves time to fix anything a store sends back.
Start a release

- Open Releases and press + New release.
- Work down the steps in the list on the left. Each step shows whether it's done, done with warnings, or still to do.
- At the bottom of every step, Save & continue → saves and moves on, Save saves and stays, and ← Back saves and goes back.
Messages on each step come in three kinds. A Blocker must be fixed before you can export. A Warning won't stop you, but read it. A Note is for information only.
To pick up a draft later, open Releases: a draft has a draft tag, and its title opens the first step you haven't saved.
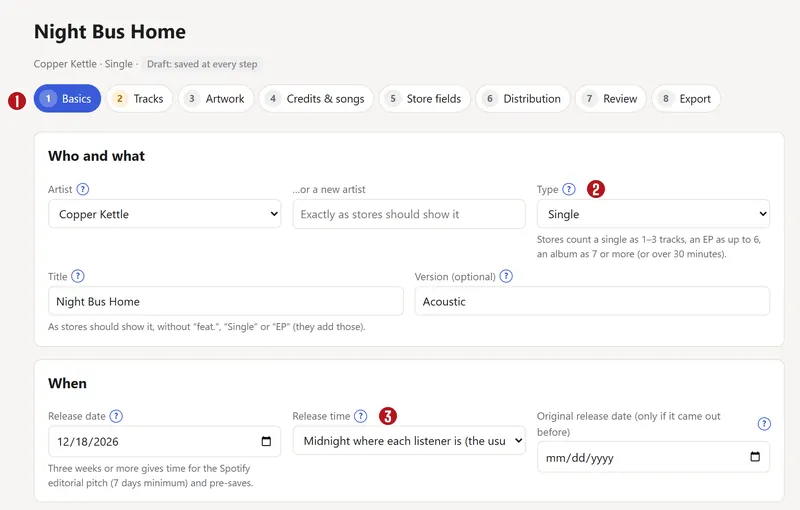
Step 1: Basics
- Artist: exactly as the stores should show it.
- Type: Single, EP or Album. Stores count a single as 1–3 tracks, an EP as up to 6, and an album as 7 or more (or over 30 minutes).
- Title: without “feat.”, “Single” or “EP”. The stores add those themselves, each in its own way.
- Version (optional): Acoustic, Remastered, Live and so on.
- Release date: it starts three weeks from today. Under seven days away gets a warning.
- Release time: “Midnight where each listener is” is the usual choice, so New Zealand hears it first. Or pick one moment worldwide in New York, Los Angeles, London or UTC time.
- Original release date: only if it came out before, for example a reissue.
- Label, ℗ line (who owns the recording) and © line (who owns the artwork and release): these start as your band's name and this year.
- Genre and Language of the lyrics (pick Instrumental if there are none).
- Explicit lyrics?: Not explicit, Explicit, or Clean (an edited version of an explicit song). This becomes every track's default.
Step 2: Tracks and audio
For each track, fill in the title, any version and featured artists, then upload the master.
- Featured artists go in their own box, not the title. Each store writes “feat.” its own way.
- ISRC (the recording's ID number): choose Give it the next code and the app makes one from your band's prefix, or It already has one and type the 12 characters. Use the old code for any song that's been released before, or its play count starts again at zero. Once saved, the ISRC shows a padlock and never changes.
- TikTok clip start (optional): where the 60-second clip starts, as minutes:seconds, like 0:45. It's also used for Instagram, YouTube Shorts, Apple and Spotify previews unless you set one per store.
- Lyrics (optional): plain text, no labels like [Chorus].
Uploading
Press Choose the master (WAV or FLAC)… and pick the file. Big files go up in 4 MB pieces. If the connection drops, pick the same file again: it carries on from where it stopped (“Carrying on from 62%…”). When the file is in, press Save to keep it on the track.
| What | Accepted | Largest |
|---|---|---|
| Audio | WAV or FLAC. AIF, MP3 and M4A upload, but fail the checks below. | 2 GB |
| Cover | JPG or PNG (TIFF uploads, with a warning) | 36 MB |
What the audio checks mean
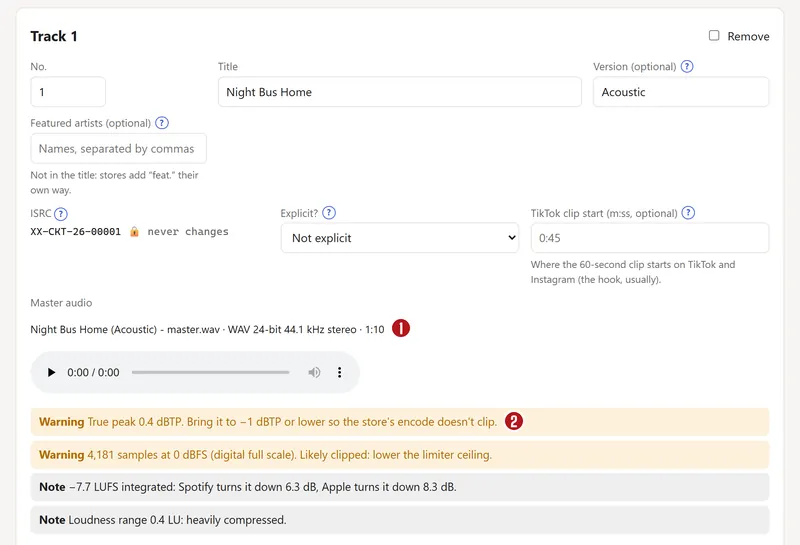
The app measures every master as soon as it's uploaded and lists what it finds on the track. A Blocker is something a store would reject. A Warning plays fine but is worth fixing. Each one names the rule and links to where it comes from.

Blockers: a store would reject it
| Check | What it means | What to do |
|---|---|---|
| Lossy file | MP3 or M4A. Stores re-encode it, so it loses quality twice. | Upload the WAV or FLAC master. |
| AIFF | Not every store takes AIFF. | Convert it to WAV or FLAC. |
| 32-bit float | A mixing format, not a delivery one. | Export as 24-bit (integer) WAV. |
| Bit depth | Anything other than 16 or 24-bit. | Export at 24-bit, or 16-bit if that's the master. |
| Sample rate | Below 44.1 kHz or above 192 kHz. | Bounce at 44.1, 48, 88.2, 96, 176.4 or 192 kHz. |
| Mono or surround | One channel, or more than two. | Bounce it as stereo, with the same audio on both sides. Surround goes as a separate Dolby Atmos delivery. |
| Silent, or one side silent | Nothing above −60 dBFS on one or both sides. | Usually a broken bounce: export it again. |
| Can't read it | The file isn't audio the app can open. | Export it again. |
Warnings: it plays, but worth fixing
| Check | What it means | What to do |
|---|---|---|
| True peak above −1 dBTP | The loudest point between samples is close to full scale. A store's encoder can make it clip. | Set the limiter's ceiling to −1 dBTP. |
| Loud and above −2 dBTP | Louder than −14 LUFS with peaks above −2 dBTP. Spotify asks for −2 dBTP on loud masters. | Lower the ceiling to −2 dBTP. |
| Samples at 0 dBFS | Samples sit at digital full scale: probably clipped. | Lower the limiter ceiling and bounce again. |
| DC offset over 0.5% | The waveform sits off centre, which wastes headroom. | A high-pass filter at 10–20 Hz on the master removes it. |
| Out of phase | Left and right largely cancel when played in mono, as on a phone speaker. | Check the polarity of one side. |
| Silence over 5 seconds at either end | TikTok rejects more than 5 seconds. | Trim it, unless it's on purpose. |
| Silence over 2 seconds at the start | Store previews and playlists start at 0:00. | Trim the start. |
| Under 60 seconds | TikTok rejects tracks under a minute. | Fine elsewhere; turn TikTok off for this one if you like. |
| Over 200 MB | TikTok takes files under 200 MB. | Upload FLAC: it's about half the size of a WAV. |
| Unusual sample rate | A rate other than the six standard ones. | Bounce at a standard rate. |
You'll also see notes that never count against you: how loud the track is in LUFS (loudness units; Spotify plays everything at about −14 and Apple at −16, so it tells you how much each will turn yours down), and whether the file is really mono in stereo clothing.
Step 3: Artwork
The cover must be square, 3000 × 3000 pixels, JPG or PNG, in RGB colour. That size fits every store.
These stop the release: not square, smaller than 3000 or larger than 5000 pixels, CMYK colour (stores reject it), or over 36 MB. Don't enlarge a small image to get to 3000: stores check for blurry covers.
Then tick the five boxes under Check the cover yourself. Stores reject covers with any of these:
- web addresses, social handles or QR codes
- store names or logos, prices, or “out now” dates
- text that doesn't match the release title and artist exactly
- blur, stretching or visible pixels
- explicit images on a release not marked explicit
Step 4: Credits and songs
Each track is a recording of a song. Pick the song, or make a new one, and say who wrote it:
- Writer: their legal name, as their PRO (BMI, ASCAP and so on) has it.
- Role: Composer & lyricist, Composer (music), Lyricist (words) or Arranger.
- Share %: the writers' shares must add up to exactly 100.
Saving proposes the split and approves your own share. The other writers then approve theirs, or sign a split sheet: see Splits. If the song already has a split, it shows here read-only.
Add other credits too: producer, performers (with their instrument), mixing, mastering and recording engineers. A cover song gets a warning: you need a mechanical licence (permission to record someone else's song), and YouTube's Content ID won't take it.
Step 5: Store fields
This step shows the release as each store will draw it, and each store's checks. See Store fields and previews.
Step 6: Distribution
- Stores: tick where it goes. Unticked stores are skipped.
- YouTube Content ID: finds your recording in other people's videos and claims the money. Leave it off for anything with samples, loops, bought beats or covers: you can't claim what isn't all yours.
- Sound libraries: lets people use the song in TikTok, Instagram and YouTube Shorts videos.
- Territories: worldwide, or only some countries.
- Pre-order: opens iTunes and Amazon pre-orders before the release date. Spotify and Apple Music pre-saves work without it.
- UPC (the release's barcode): let the distributor assign one for free, or type your own. Once saved, it never changes.
This step also checks your plan. Sending releases needs the Band plan, a passed identity check, and room in this month's limit. See Billing and plans.
Step 7 and 8: Review and export
Review lists every blocker and warning from every step, plus the delivery partner's own checks, then the summary, the tracks and the store preview. When nothing blocks, Build the package → turns on.
Export builds the delivery package: the cover, the masters, and a sheet of every field. The release stops being a draft. Nothing goes to any store until the package is uploaded.
Questions
Why did my audio get a warning?
Usually because the master is mastered right up to full scale. The most common warning is a true peak above −1 dBTP: when a store turns your WAV into its own format, those peaks can clip. Set your limiter's ceiling to −1 dBTP (−2 if the track is very loud) and bounce again. A warning never stops the release; it just tells you what a store's encoder might do to it.
Can I change the ISRC or UPC after saving?
No. Once saved, both are locked for good. Stores track play counts, playlists and money by these codes, so changing one would make the stores treat it as a different recording or release.
Does a draft use up my monthly release limit?
No. Only building the package for a new release counts. Drafts, updates to a release that's already out, and takedowns never count.
How far ahead should the release date be?
Three weeks or more. Spotify needs at least seven days to consider a song for editorial playlists, and the extra time covers a store asking for a fix.
About the picturesThey show Copper Kettle, the made-up band from our guide. Every name, code and dollar in them is invented. Numbered red dots on a picture match the numbered steps.